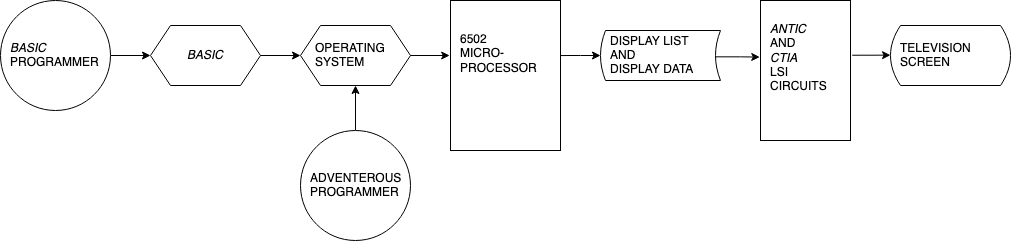
Figure 1: Information flow for Atari 400/800 display. The adventurous programmer who bypasses BASIC gains more control over the display list and display data, and thus is able to customize the displayed image to a greater extent.
The Atari 400 and 800 are second-generation personal computers. In addition to the normal memory and processor integrated circuits, they contain three special-purpose LSI (large-scale integrated) circuits which make them capable of many feats of computing legerdemain. Most of this power, however, lies brooding beneath many layers of "human engineering." The beginning programmer working in BASIC is paternalistically protected from the complexities and power of the beast within, The more experienced programmer seeking cybernetic high adventure must first defeat the friendliness engineered into the machine to unleash its throbbing brute power. Without help, this can be most difficult. We will act as native guides for one region of this complex machine: the display list. We will show you how to generate flashy displays by creating you own display list and redefining the character set.
Most personal computers use a straightforward memory-mapped display in which the screen format is fixed and each screen pixel's (picture element's) contents are provided by a specific location in memory. This is a simple scheme demanding little of either the programmer or the computer. The Atari 400/800 uses a more complex scheme involving a display list and display data. A display list is a sequence of commands that defines the vertical format of the video display; the display data is the information to be displayed.
Figure 1:
Information flow for Atari 400/800 display. The
adventurous programmer who bypasses BASIC gains more
control over the display list and display data, and
thus is able to customize the displayed image to a
greater extent.
The Atari 400/800 display list is actually a small program; it is processed by a special LSI circuit called ANTIC. ANTIC is a dedicated microprocessor whose sole function is to control the video display. ANTIC uses a process called DMA (direct memory access) to gain access to the display list and display data. The display list and display data are stored by the high-speed (1.8 MHz) 6502 microprocessor. When the BASIC programmer types GRAPHICS n, the operating system writes a complete display list into memory and clears the display data. The information flow for this process is diagrammed in figure 1. Clearly, the adventurous programmer who bypasses BASIC and writes his or her own display list will have more direct control over the screen.
Associated with the display list are the concepts of a graphics mode and a graphics-mode line. The Atari 400/800 supports fourteen fundamental graphics modes, only nine of which are directly accessible from BASIC. The first six modes (three of which are accessible from BASIC) are character modes which display characters in different combinations of size and color. The remaining eight graphics modes display squares of color in different resolution and color combinations. A graphics-mode line is a group of horizontal-scan lines which are treated as a unit for display purposes. (A horizontal-scan line is a single sweep of the electron beam across the television screen. There are 192 horizontal-scan lines in the visible area of the screen.) A graphics-mode line will contain between one and sixteen horizontal-scan lines, depending on the graphics mode involved. A graphics-mode line stretches horizontally all the way across the screen (you cannot change graphics modes halfway across the screen). The video display is thus organized as a vertical sequence of mode lines of varying height and contents. There are many thousands of possible sequences of mode lines on the screen; BASIC restricts the programmer to seventeen such sequences. Each such sequence is referred to in the BASIC manual as a graphics mode.
The display list and the display data normally reside at the top
of available memory-address space, Since the amount of available
memory is not fixed, the operating system must keep track of the
address of the display list. The address of the beginning of the
list is stored in decimal addresses 560 and 561.
The first 3 bytes in the display list skip twenty-four blank scan
lines, which is necessary to defeat the vertical overscan of many
television sets. The next byte is called the LMS (load memory scan)
byte. It defines the first mode line of the display and also instructs
ANTIC that the following 2 bytes give the address at which display
data can be found. Since we rarely need to tamper with these first
4 bytes, we will start with the fifth byte, whose address we will
assign to a BASIC variable called START. The value of
START can be calculated by:
START = PEEK(560)+256*PEEK(561)+4
The bytes at this location and the succeeding location give the
starting address of the display data. Beginning at location
START+2 is a sequence of mode bytes which
specify the mode lines for the display. The codes for these mode
bytes are found in table 1. The programmer has the freedom to create
any sequence of mode bytes for the display list. The programmer also
has the responsibility to insure that the chosen sequence includes
exactly 192 horizontal-scan lines. At the end of the mode-byte
sequence, the programmer must place an ANTIC JUMP byte (decimal 65)
followed by the low- and high-order address bytes of the beginning of
the display list---four bytes lower in memory than the location
we refer to as START.
The starting address of the display data, which we will assign to a
BASIC variable called MEMST, can be calculated from:
MEMST = PEEK(START)+256*PEEK(START+1)
The display data is simply strung together in sequence; this can cause a headache when mixing modes. Since different mode lines require different numbers of display-data bytes, the programmer wishing to change a display-data byte must calculate its position in display-data memory by adding up the space requirements of each previous mode line. The BASIC POSITION and PLOT commands work reliably only with the homogeneous display lists used by BASIC, so the programmer who mixes modes must expend greater effort to use such a specialized display.
| Mode | Remark | Left 4 Bits | Right 4 Bits | Color Dots Per Pixel | Scan Lines Per Mode Line | Number of Colors | BASIC Mode | Bytes Per Line |
|---|---|---|---|---|---|---|---|---|
| character | 1 | 0 | 2 | ½ | 8 | 1½ | 0 | 40 |
| character | 1 | 0 | 3 | ½ | 10 | 1½ | - | 40 |
| character | 1 | 0 | 4 | 1 | 8 | 4 | - | 40 |
| character | 1 | 0 | 5 | 1 | 16 | 4 | - | 40 |
| character | 1 | 0 | 6 | 1 | 8 | 5 | 1 | 20 |
| character | 1 | 0 | 7 | 1 | 16 | 5 | 2 | 20 |
| character | 1 | 0 | 8 | 4 | 8 | 4 | 3 | 10 |
| character | 1 | 0 | 9 | 2 | 4 | 2 | 4 | 10 |
| graphic | 1 | 0 | A | 2 | 4 | 4 | 5 | 20 |
| graphic | 1 | 0 | B | 1 | 2 | 2 | 6 | 20 |
| graphic | 1 | 0 | C | 1 | 1 | 2 | - | 20 |
| graphic | 1 | 0 | D | 1 | 2 | 4 | 7 | 40 |
| graphic | 1 | 0 | E | 1 | 1 | 4 | - | 40 |
| graphic | 1 | 0 | F | ½ | 1 | 1½ | 8 | 40 |
| special | 2 | 0-7 | 0 | Blank | - | - | - | - |
| special | 3 | 4 | 1 | JUMP | - | - | - | - |
Table 1:
Interpretation of the graphics-mode-byte codes.
Remarks are as follows:
Where 1½ colors are indicated, the hue of the foreground color cannot be controlled.
We shall now illustrate these principles with a sample program and its resultant display, display list, and display data. The program is a straightforward affair which plots the BYTE logo in graphics mode 7+16. The program is presented in listing 1, and the display it produces is shown in photo 1. Figure 2a and table 2a show the display list for this display. Since this is a standard BASIC graphics-mode display list, it is neat and tidy.
100 GRAPHICS 7:COLOR 1:POKE 765,1:POKE 710,128:POKE 712,128
110 A=0:READ B,C:IF B>-1 THEN GOSUB 800:GOTO 110
120 READ A,B,C:IF A>-1 THEN GOSUB 800:GOTO 120
130 END
800 ON A+1 GOTO 810,820,830
810 PLOT B,C:RETURN
820 DRAWTO B,C:RETURN
830 POSITION B,C:XIO 18,#6,0,0,"S:":RETURN
900 DATA 111,30,111,31,110,31,109,31,108,32,107,33,107,34
905 DATA 106,35,106,36,107,37,107,38,108,39,109,40,110,40,111,40
910 DATA 111,41,110,41,109,41,108,42,107,43,107,44,106,45
915 DATA 106,46,107,47,107,48,108,49,109,50,110,50,111,50,111,51
920 DATA -1,-1,1,97,51,2,96,50,1,96,50,2,96,31
925 DATA 2,97,30,0,93,31,1,92,31,1,91,31,1,90,32,1,89,33,1,89,34
930 DATA 1,88,35,1,88,50,1,87,51,1,80,51,2,79,50,0,79,50
935 DATA 2,79,35,0,79,35,2,78,34,0,78,34,2,78,33,0,78,33,2,77,32
940 DATA 0,77,32,2,76,31,1,74,31,1,74,30,1,93,30,0,71,30
945 DATA 1,71,46,1,70,30,1,70,46,1,69,43,1,69,46,1,68,44,1,68,46
950 DATA 1,67,44,1,67,50,1,66,51,1,59,51,2,58,50,0,58,50
955 DATA 2,58,46,1,54,46,2,54,44,1,64,43,1,63,42,1,63,31,1,62,30
960 DATA 1,55,30,2,54,31,0,54,31,2,54,43,0,51,31
965 DATA 1,51,39,0,51,42,1,51,50,1,50,51,1,50,42,0,50,39,1,50,30
970 DATA 1,49,30,1,49,32,0,49,38,1,49,43,0,49,49
975 DATA 1,49,51,1,48,51,1,48,50,0,48,42,1,48,39,0,48,31,1,48,30
980 DATA 1,46,32,0,46,38,0,46,43,0,46,49,1,45,46,1,45,43
985 DATA 0,45,38,1,45,33,0,47,51,1,36,51,2,35,50,0,35,50,2,35,31
990 DATA 1,36,30,1,49,30,-1,0,0
Listing 1:
Atari 400/800 program to plot the BYTE logo, shown in photo 1. See table 2 on page 26 for details.

Photo 1:
The BYTE logo as displayed by the Atari 400/800 running the program of listing 1. See table 2 for details.
With the formal goal of improving the display and the heuristic goal of demonstrating display-list manipulations from BASIC, we shall now tamper with this display list. The first step in this process is to prepare our proposed display list on paper. The desired screen format is shown in figure 2b.

Figure 2:
Horizontal-scan line arrangement for normal- and modified-display
screens. The video screen in figure 2a is composed completely of mode-7
horizontal lines. In figure 2b, the video screen is constructed from
multiple-mode sections that allow a mix of images to be displayed.
Refer to table 2 for details.
We must consult table 3 to determine which of the display modes will require the greatest amount of memory space. In our case, we are using modes 0, 1, 2, and 7; mode 7 is clearly the most memory-intensive mode. We shall therefore start with mode 7 and modify the mode-7 display list. It is always easier to pare down an oversized display list than to build up an undersized one.
| Mode | 8 + 16 | 8138 | Bytes |
|---|---|---|---|
| 8 | 8112 | ||
| 7 + 16 | 4200 | ||
| 7 | 4190 | ||
| 6 + 16 | 2184 | ||
| 6 | 2174 | ||
| 5 + 16 | 1176 | ||
| 5 | 1174 | ||
| 4 + 16 | 696 | ||
| 4 | 694 | ||
| 3 + 16 | 432 | ||
| 3 | 434 | ||
| 2 + 16 | 420 | ||
| 2 | 424 | ||
| 1 + 16 | 672 | ||
| 1 | 674 | ||
| 0 | 992 |
Table 3: Memory requirements for various graphics modes.
Next, we must verify that our proposed display list does indeed produce 192 horizontal-scan lines. Consult table 1 to find the number of scan lines per mode line. Our calculation produces the following results:
| Mode | Number of Mode Lines | Scan Lines Per Mode Line | Total Scan Lines |
|---|---|---|---|
| 0 | 1 | 8 | 8 |
| 1 | 4 | 8 | 32 |
| 2 | 4 | 16 | 64 |
| 7 | 44 | 2 | 88 |
| Total | 192 | ||
We now determine the mode bytes for each of the mode lines by looking them up in table 1. It is handy to convert these to decimal for later use. Our results are:
| Mode | Hexadecimal Mode Byte | Decimal Mode Byte |
|---|---|---|
| 0 | 02 | 2 |
| 1 | 06 | 6 |
| 2 | 07 | 7 |
| 7 | 0D | 13 |
The results of this paperwork are presented in table 2b.
|
|
||||||||||||||||||||||||||||||||||||||||||||||||||||||||||||||||||||||||||||||||||||||||||||||||||||||||||||||||||||||||||||||||||||||||||||||||||||||||||||||||||||||||||||||||||||||||||||||||||||||||||||||||||||||||||||||||||||||||||||||||||||||||||||||||||||
Table 2: Normal- and modified-display lists correspond to the lines displayed in figure 2. The program corresponding to table 2a is given in listing 1, and the actual display is pictured in photo 1. Listing 2 corresponds to table 2b.
Now, at last, we are ready to write some code. Please refer to listing 2 in conjunction with this narrative. We begin by checking to see that there is enough memory available to reposition the display list (line 0). If there isn't enough, the program aborts. We then move the top of available memory down by 4 K bytes and execute a GRAPHICS call (line 20) to write a new display list and display data in memory. This procedure reserves 4 K bytes of memory for our own use later on. We then define our display strings (lines 30 and 40) and execute another GRAPHICS call to initialize our display list---which we shall subsequently modify. The series of POKEs in lines 50 and 55 define the colors we will be using and turn off the character display while we redefine our characters.
0 IF FRE(0)<5825 THEN PRINT "NOT ENOUGH MEMORY!":END
20 RAMTOP=PEEK(106):POKE 106,RAMTOP-16:GRAPHICS 0
30 DIM SML$(32):SML$(1,32)=" the small systems journal "
40 DIM MGH$(41):MGH$(1,41)="@@@A@McGRAW@HILL@@@@@@@@PUBLICATION"
50 GRAPHICS 7+16:COLOR 2:POKE 765,2
55 POKE 708,128:POKE 709,40:POKE 710,128:POKE 712,128
60 START=PEEK(560)+PEEK(561)*256+4
70 POKE START+10,2
80 FOR X=0 TO 3:POKE START+46+X,6:NEXT X
90 FOR X=0 TO 3:POKE START+50+X,7:NEXT X
95 POKE START+54,65:POKE START+55,PEEK(560):POKE START+56,PEEK(561)
110 A=0:READ B,C:IF B>-1 THEN GOSUB 800:GOTO 110
120 READ A,B,C:IF A>-1 THEN GOSUB 800:GOTO 120
200 CHBAS=RAMTOP-4:ADDR=CHBAS*256
210 FOR X=0 TO 1023:POKE ADDR+X,PEEK(57344+X):NEXT X
220 POKE 756,CHBAS+2
230 FOR X = 0 TO 255:POKE ADDR+512+X,PEEK(ADDR+256+X):NEXT X
240 FOR X = 0 TO 7:POKE ADDR+512+X,0:NEXT X
250 FOR X = 0 TO 7:READ A:POKE ADDR+99*8+X,A:NEXT X
290 POKE 755,0:POKE 87,0
300 POSITION 4,9:? #6;"AUGUST 1980 Volume 5, Number 8";
310 MEMST=PEEK(START)+PEEK(START+1)*256:CHRPOS=MEMST+46*40
320 FOR X = 1 TO LEN(SML$):POKE CHRPOS+X-1,ASC(SML$(X,X))+128:NEXT X
330 CHRPOS=CHRPOS+60
340 FOR X = 1 TO LEN(MGH$):POKE CHRPOS+X-1,ASC(MGH$(X,X))-64:NEXT X
350 POKE 708,200
360 GOTO 360
800 ON A+1 GOTO 810,820,830
810 PLOT B,C:RETURN
820 DRAWTO B,C:RETURN
830 POSITION B,C:XIO 18,#6,0,0,"S:":RETURN
900 DATA 111,20,111,21,110,21,109,21,108,22,107,23,107,24
905 DATA 106,25,106,26,107,27,107,28,108,29,109,30,110,30,111,30
910 DATA 111,31,110,31,109,31,108,32,107,33,107,34,106,35
915 DATA 106,36,107,37,107,38,108,39,109,40,110,40,111,40,111,41
920 DATA -1,-1,1,97,41,2,96,40,1,96,40,2,96,21
925 DATA 2,97,20,0,93,21,1,92,21,1,91,21,1,90,22,1,89,23,1,89,24
930 DATA 1,88,25,1,88,40,1,87,41,1,80,41,2,79,40,0,79,40
935 DATA 2,79,25,0,79,25,2,78,24,0,78,24,2,78,23,0,78,23,2,77,22
940 DATA 0,77,22,2,76,21,1,74,21,1,74,20,1,93,20,0,71,20
945 DATA 1,71,36,1,70,20,1,70,36,1,69,33,1,69,36,1,68,34,1,68,36
950 DATA 1,67,34,1,67,40,1,66,41,1,59,41,2,58,40,0,58,40
955 DATA 2,58,36,1,54,36,2,54,34,1,64,33,1,63,32,1,63,21,1,62,20
960 DATA 1,55,20,2,54,21,0,54,21,2,54,33,0,51,21
965 DATA 1,51,29,0,51,32,1,51,40,1,50,41,1,50,32,0,50,29,1,50,20
970 DATA 1,49,20,1,49,22,0,49,28,1,49,33,0,49,39
975 DATA 1,49,41,1,48,41,1,48,40,0,48,32,1,48,29,0,48,21,1,48,20
980 DATA 1,46,22,0,46,28,0,46,33,0,46,39,1,45,36,1,45,33
985 DATA 0,45,28,1,45,23,0,47,41,1,36,41,2,35,40,0,35,40,2,35,21
990 DATA 1,36,20,1,49,20,-1,0,0
999 DATA 0,60,96,96,96,60,0,0
Listing 2: Atari 400/800 program to plot the BYTE logo and the other characters as displayed in photo 2.
We then calculate the variable START in line 60. In lines 70
thru 90, we POKE the new and different mode bytes
into the display list to create our new display list. The offsets from
START (the numbers added to START) are
simply the mode-line numbers for the new mode lines. Thus, the offset in line 70 is 10
because the mode byte we are POKEing is for the
tenth mode line from the top of the screen. (Remember, a mode line is not the same as
a scan line.) In line 95, we POKE the ANTIC JUMP
byte and the jump-address bytes at the end of our new display list. The value of the
jump-address bytes points to the beginning of the display list and can be found in
locations 560 and 561.
We have just created a new display list on top of the original one. Now we must put a display onto the screen. This will be a tricky operation; as we mentioned earlier, the PLOT and POSITION commands will not quite work as we expect them to. Some extra effort is necessary to produce a display. Fortunately, our GRAPHICS 7 plotting of the BYTE logo will still work the same way. Because we have inserted a mode-0 line above it, the logo will be shifted down on the screen by six scan lines. This shift is so small that we can neglect it and plot the logo with the same routine used earlier, This is done in lines 110 and 120.
Now that we have plotted the logo, we desire to print some other characters as shown in photo 2. Two problems impede us: first, we must redefine the character set to mix uppercase and lowercase characters; second, we must calculate where these characters go.
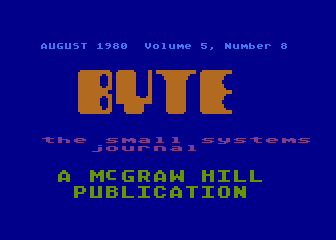
Photo 2:
The BYTE logo as displayed by the Atari 400/800 running the program in listing 2.
The first problem arises from the natural limitations of an 8-bit processor. If four colors are supported (as in GRAPHICS 1 and 2), only 64 distinct characters can be displayed in each color. This is because 2 bits are required to specify the color, leaving only 6 bits to specify the character. This restricts our available set; the Atari character set in ROM (read-only memory) supplies uppercase and punctuation or lowercase and graphics symbols, but not uppercase and lowercase together---at least not in GRAPHICS 1 or 2. Since we want uppercase and lowercase together, we will have to redefine the character set.
To do this, we must have some memory reserved for the new character set,
Line 20 did this by fooling the operating system into believing that the
top of memory (called RAMTOP) lies sixteen pages lower than
it actually does. This has reserved 4 K bytes for our use. The character set needs
only 1 K bytes, but the display data cannot cross a 4 K boundary (without entailing
difficulty), hence we must move the display list and display data down by an entire
4 K. The address of the beginning of our new character set is calculated in line 200
and is called ADDR.
In line 210, we move the original character set (starting at address 57344
in ROM) into user memory. In line 220, we tell the operating system where the new
character set is. In line 230, we move the uppercase characters into the positions
previously occupied by punctuation. Our new 64-member character set has uppercase
and lowercase, but very little punctuation. In line 240, we define a new space
character, as the original space character was part of the old punctuation group.
We shall use the place previously occupied by the @ character for our space character.
We next take this technique of defining our own characters one step further. We had earlier decided to elevate the lowercase "c" in "McGraw-Hill." To do this, we must redefine what a lowercase "c" looks like. This is done in line 250, with data coming from line 999. Obviously, this procedure can be greatly extended. The diligent programmer can define any character set that can be expressed in an 8- by 8-pixel grid and POKE it into user memory directly (see figure 3). Greek, Cyrillic, or special technical character sets can be created in this way.
| 8 BY 8 PIXEL SQUARE |
BINARY | HEXADECIMAL | DECIMAL | ||||||||||||||||||||||||||||||||||||||||||||||||||||||||||||||||||||||||||||||||||||||||||||||||||||||||||||||||||||||||||||||||||||||||||||||||
|---|---|---|---|---|---|---|---|---|---|---|---|---|---|---|---|---|---|---|---|---|---|---|---|---|---|---|---|---|---|---|---|---|---|---|---|---|---|---|---|---|---|---|---|---|---|---|---|---|---|---|---|---|---|---|---|---|---|---|---|---|---|---|---|---|---|---|---|---|---|---|---|---|---|---|---|---|---|---|---|---|---|---|---|---|---|---|---|---|---|---|---|---|---|---|---|---|---|---|---|---|---|---|---|---|---|---|---|---|---|---|---|---|---|---|---|---|---|---|---|---|---|---|---|---|---|---|---|---|---|---|---|---|---|---|---|---|---|---|---|---|---|---|---|---|---|---|---|
|
|
|
|
Figure 3: The assignment of values to create an elevated lower-case "c" character.
We now have our display list and character set in order. We need only display our text. This is done starting at line 290. The first POKE suppresses the cursor for a neater display; the second POKE fools the operating system into believing that it is working in mode 0. This prepares the way for a straightforward POSITION and PRINT of the first text line. The only trick is that the line is positioned vertically according to the number of mode lines from the top of the screen.
The next two text lines pose a particularly knotty problem. We desire to print
GRAPHICS 1 and 2
characters on mode lines 46 thru 52. Neither graphics mode allows so many lines;
when we try to position the cursor onto line 46 the computer will generate a
"cursor out of range" error. Our only recourse is to POKE
the character bytes directly into the display memory. We do this starting at
line 310. First, we calculate the starting address of the display memory
(MEMST). Then we calculate the address where our
characters are to be stored (CHRPOS). Our calculation
relies on the fact that the characters are on the 46th line and all previous
lines used 40 bytes each. In more complicated situations, we would have to add
up the byte requirements of all previous lines. This can get messy when a display
mixes mode-1 or mode-2 lines at 20 bytes per line with other modes that use 40
bytes per line. Fortunately, our case is simple. Once CHRPOS
has been calculated, we POKE the character
values into the display data using a simple loop (line 320). Adding 60 to
CHRPOS (line 330) skips three of our 20-byte mode-1 or
mode-2 lines. We then POKE the character
values for our third text line using the same technique we used in line 320,
except that a different character-value offset (-64 instead of +128) gives us
green characters instead of red ones. Line 350 turns the characters back on.
The two major tricks we have demonstrated in this article (modifying the display list and redefining the character set) will greatly extend the graphics and display power of your BASIC programs. The Atari 400/800 running BASIC alone has stunning graphics capabilities. With these tricks, the machine brings previously unheard-of capabilities into the hands of the personal computer owner. Yet, we are still just trundling down the runway. There are even grander functions built into this machine---movable graphics objects for animation, vertical and horizontal fine scrolling, and display-list interrupts, to name a few. With these tricks in hand, we can soar beyond the limits of yesterday's color display and animation. ¤
